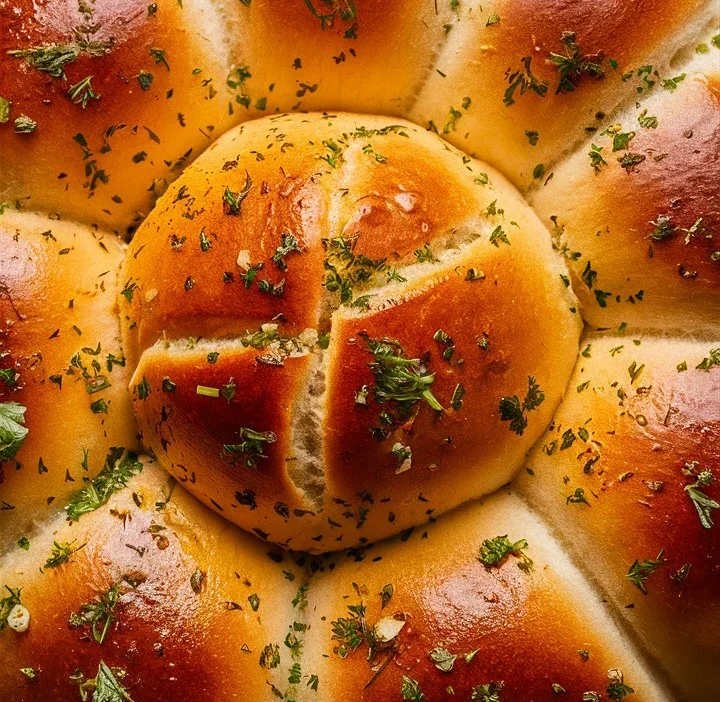
There’s something magical about the smell of freshly baked bread drifting through your home. Now imagine adding garlic and melted butter to that mix—a combination that delivers not only flavor but a comforting culinary experience that warms the soul.
Garlic butter bread rolls are the kind of treat that elevates a simple meal into something memorable. Whether you’re preparing a festive dinner or a casual weeknight meal, these soft, fluffy, and flavorful rolls will steal the spotlight on any table.
This comprehensive guide will take you through the process of crafting perfect garlic butter bread rolls from scratch. You’ll learn everything from ingredients and methods to clever tricks for professional results at home.
Sorry Generator
💛 2. Why You’ll Love These Garlic Butter Bread Rolls
Here’s why this recipe is a must-try:
- ✅ Easy to Make: You don’t need to be an expert baker. Simple instructions and common ingredients make this perfect for beginners.
- ✅ Incredible Flavor: The irresistible combination of soft bread, real butter, and fresh garlic is a culinary classic.
- ✅ Customizable: Add cheese, herbs, or spices to make them your own.
- ✅ Freezer-Friendly: These rolls can be made ahead and stored for later.
- ✅ Versatile: Perfect with soups, pastas, roasted meats, or even just by themselves.
These rolls aren’t just a side dish—they’re the highlight.
🧂 3. Ingredients You’ll Need
Let’s break down the core ingredients and why each one matters:
For the Dough:
- All-Purpose Flour – Gives structure and softness.
- Active Dry Yeast – Helps the dough rise and become fluffy.
- Warm Water (110°F/43°C) – Activates the yeast.
- Granulated Sugar – Feeds the yeast and adds a slight sweetness.
- Salt – Enhances the overall flavor.
- Unsalted Butter (melted) – Adds richness and softness.
- Milk – Improves tenderness and color.
For the Garlic Butter Topping:
- Unsalted Butter – The base for flavor.
- Fresh Garlic (minced) – The hero of the recipe.
- Fresh Parsley or Oregano (optional) – Adds a fresh, herby kick.
- Salt (optional) – Enhances the garlic flavor.
- Grated Parmesan (optional) – For a cheesy twist.
🧰 4. Kitchen Tools Required
Keep these tools handy before you begin:
- Large mixing bowl
- Measuring cups and spoons
- Whisk or stand mixer with dough hook
- Dough scraper or knife
- Baking dish or tray
- Pastry brush
- Kitchen towel or plastic wrap
- Oven thermometer (optional but helpful)
👩🍳 5. Step-by-Step Instructions
Follow these steps closely to make bakery-quality garlic butter bread rolls at home.
🔹 Step 1: Activate the Yeast
In a large mixing bowl, combine:
- 1 cup of warm water (not hot)
- 2 ¼ teaspoons active dry yeast
- 1 tablespoon sugar
Let it sit for 5–10 minutes until it becomes frothy. If it doesn’t foam, the yeast may be dead—start again.
🔹 Step 2: Make the Dough
Add to the yeast mixture:
- 3 cups all-purpose flour (start with 2 ½ and add more as needed)
- 1 teaspoon salt
- ¼ cup melted butter
- ¼ cup warm milk
Mix using a wooden spoon or mixer until a sticky dough forms. Add small amounts of flour if too wet.
🔹 Step 3: Knead the Dough
Transfer the dough to a floured surface and knead for about 8–10 minutes, until smooth and elastic.
Tip: The dough should spring back when pressed gently.
🔹 Step 4: First Rise
Form the dough into a ball and place it in a greased bowl. Cover with a damp towel or plastic wrap. Let it rise in a warm place for 1 to 1.5 hours, or until doubled in size.
🔹 Step 5: Shape the Rolls
Punch down the dough. Divide it into 12 equal portions and roll them into balls. Place them in a greased baking dish, leaving a little space between each.
🔹 Step 6: Second Rise
Cover the dish and let the rolls rise again for 30–40 minutes until puffy.
🔹 Step 7: Prepare Garlic Butter
In a small saucepan, melt:
- ½ cup unsalted butter
- 4 cloves garlic, minced
- Optional: 1 tablespoon chopped parsley or oregano
- Optional: 2 tablespoons Parmesan
Let it simmer for 2 minutes, then remove from heat.
🔹 Step 8: Bake the Rolls
Preheat your oven to 375°F (190°C). Brush half the garlic butter over the rolls before baking.
Bake for 20–22 minutes, or until golden brown.
🔹 Step 9: Finish with More Butter
Remove rolls from the oven and brush with the remaining garlic butter. Serve warm.
💡 6. Tips for Perfect Rolls Every Time
- Use Fresh Yeast: Expired yeast = flat rolls.
- Don’t Overknead: Overworking the dough can make it dense.
- Measure Flour Correctly: Spoon and level it into the cup, don’t pack it.
- Second Rise is Crucial: Don’t skip it—it creates that pillowy texture.
- Room Temperature Ingredients: Always allow milk and butter to come to room temp before use.
🧀 7. Flavor Variations to Try
Want to experiment? Try these twists:
- Cheesy Garlic Rolls: Add mozzarella or cheddar inside the dough balls.
- Herbed Rolls: Mix rosemary, thyme, or Italian seasoning into the dough.
- Spicy Kick: Add chili flakes or cayenne to the garlic butter.
- Stuffed Rolls: Fill with cream cheese or spinach-artichoke dip before baking.
🥗 8. What to Serve with Garlic Butter Bread Rolls
These rolls are incredibly versatile. Pair them with:
- 🍲 Soups: Tomato, mushroom, or creamy broccoli.
- 🍝 Pasta: Alfredo, marinara, or baked ziti.
- 🥩 Grilled Meat: Steak, chicken, or lamb.
- 🥗 Salads: Caesar, Greek, or mixed greens.
- 🍳 Breakfast: Serve with scrambled eggs and bacon.
🕒 9. Make-Ahead, Storage & Reheating
Make-Ahead Tips:
- Prepare dough up to 24 hours in advance.
- Refrigerate after first rise, then bring to room temp before shaping.
Storage:
- Keep leftover rolls in an airtight container for 2–3 days at room temp.
- Refrigerate up to 1 week or freeze for up to 3 months.
Reheating:
- Oven: Wrap in foil and bake at 350°F (175°C) for 10–12 minutes.
- Microwave: 15–20 seconds covered with a damp paper towel.
❌ 10. Common Mistakes and How to Avoid Them
| Mistake | Problem | Solution |
|---|---|---|
| Cold water for yeast | Yeast won’t activate | Use water at 110°F |
| Skipping second rise | Dense, heavy rolls | Always let rise twice |
| Overkneading | Tough texture | Knead just until smooth |
| Cold butter/milk | Inhibits rise | Use room temp ingredients |
| Not preheating oven | Flat or uneven baking | Always preheat fully |
❓ 11. Frequently Asked Questions (FAQs)
Q: Can I use instant yeast instead of active dry?
Yes, just skip the activation step and mix directly with the flour.
Q: Can I freeze the dough?
Absolutely! Freeze after shaping. Thaw, allow a second rise, and bake.
Q: Are these rolls vegetarian?
Yes, as long as you use vegetarian-friendly butter.
Q: Can I make these without milk?
Yes. Substitute with water or dairy-free milk for a similar result.
Q: Can I add toppings?
Sure! Sprinkle sesame seeds, cheese, or garlic salt on top before baking.
✨ 12. Final Thoughts
Making garlic butter bread rolls from scratch may seem intimidating, but it’s incredibly rewarding. With the right techniques, simple ingredients, and a little love, you can bake rolls that are soft, buttery, and full of flavor.
These aren’t just any bread rolls—they’re an experience. Whether you’re enjoying them as a snack or pairing them with a fancy dinner, their irresistible aroma and pillowy softness will always have you reaching for one more.